I see people saying Spec Driven Development is the way to produce good software using AI Coding Agents (totally agree)—something as the natural evolution of vibe coding. But whenever I see examples or videos of people explaining it, they always involve projects built from scratch or really simple ones.
In the following paragraphs, I expect you to understand which commands to use, when, and why — and then you will be able to work smoothly with Spec Driven Development using the Github Spec Kit.
Spec-Driven Development (SDD)
Since AI Coding Agents became good at coding (mid 2025?), we’ve been building projects and features while forgetting everything we learned during the Agile wave. Personally, I’m a big fan of Agile, and sometimes I try to apply it even at home (my wife hates it).
Sometimes, some people think Agile = Scrum, but it’s so much more than that.
Writing prompts, without any structure or framework, with the powerful models we have today, is a waste of resources. Spec-Driven Development isn’t entirely new, either — Sam Hatoum has been using this term since 2018.
As you can imagine by the name, SDD is an approach where the spec is the source of truth, not the code. That means, you should be able — for example — to rebuild a specific feature in a completely different tech stack just by following the specification. Throughout my 12 years in software development, I’ve watched documentation become increasingly deprioritized during real projects. You can’t do that with SDD; keeping the documentation updated is non-negotiable.
What’s the Github Spec Kit
I first came across it in a blog post by Birgitta Böckeler on Martin Fowler’s blog. To support the practice of SDD with AI, the Github team launched its kit in September 2025. It’s a CLI — though you can also download the project for your AI coding agent and manage it manually — designed to maintain evolving software specifications.
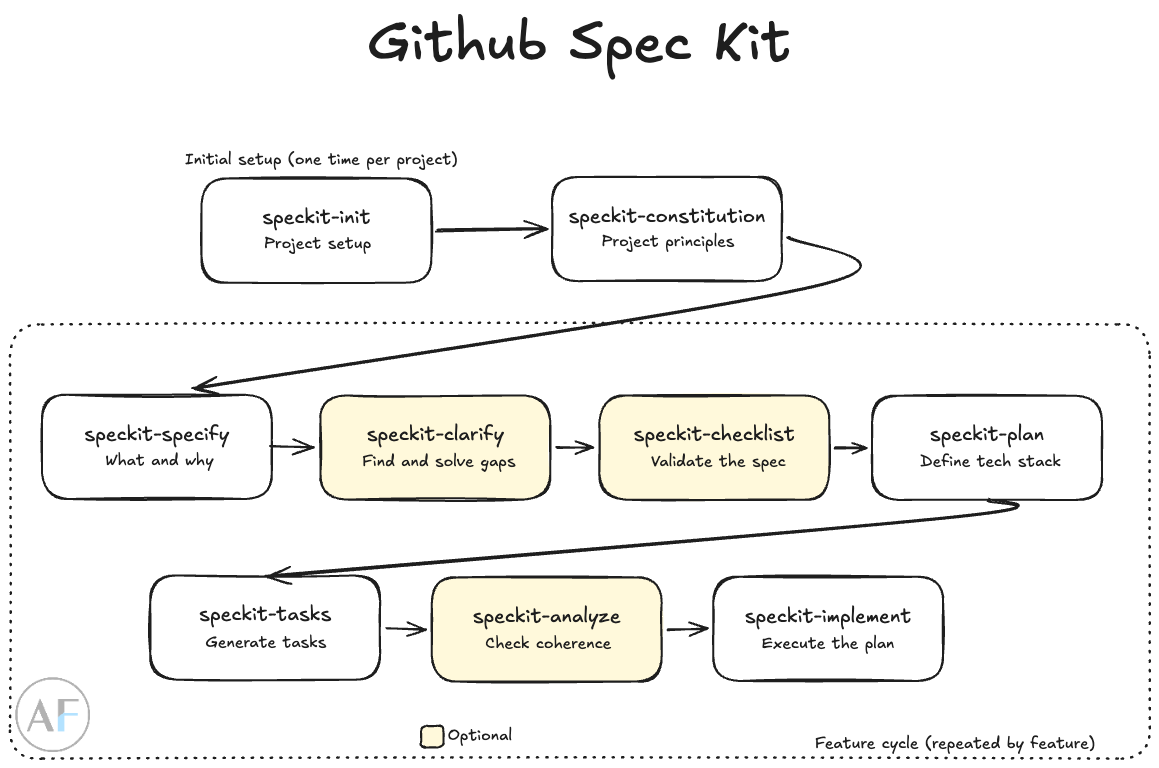
speckit-init
This is the initial setup; you run it once per project. You’ll be asked which AI tool you want to integrate (Codex/Copilot/Claude). If the project already exists, navigate to the project’s folder and type --here at the end of the command.
speckit-constitution
This command creates the governance principles and development guidelines. It’s about the project as a whole, not about a feature or bug fix. You run it only once, but you’re expected to keep it updated whenever something significant changes.
You can ask your AI Coding Agent to populate the constitution with the bare minimum requirements for your project type, based on the template.
Feature Cycle
These are the commands you’ll run every time you start a new feature.
speckit-specify
This is probably the longest prompt you will type. If your project follows a Scrum/Agile structure with Stories and Tasks, this is where you put the Story description, definition of done, and everything related to your goal.
Describe what you want to build, focused on what and why, not on the tech stack.
speckit-clarify (optional)
This step is not required, but if you don’t have a Product Owner, or you are developing solo, I would strongly suggest running it after specify. This command helps surface blind spots in your spec.
For example, you may have defined a list, but forgotten to specify the sort order or pagination size. clarify will prompt you about these gaps. It’s a great way to flip the usual dynamic and let your AI Coding Agent interview you about the requirements.
speckit-checklist (optional)
This command was added after the community feedback; it wasn’t part of the tool at launch.
Their Readme describes this step as “unit tests for English” and I kinda like it. It validates the completeness, clarity, and consistency of your requirements. Instead of testing the code, it tests the text of your spec. By domain (UX, security, accessibility, performance, API…), it produces checkboxes to verify the spec is solid before any tasks begin.
speckit-plan
This is the moment to propose and describe the tech stack and architecture choices. One critical thing during this step: actually read the plan and validate it. Remove anything you don’t need, refine a few things. I consider this the main human-in-the-loop step of the Spec Kit.
You can iterate using your AI Coding Agent until the plan covers everything you need, without garbage or gaps.
speckit-tasks
Simple command. No input needed. The Spec Kit generates the tasks for this feature based on the plan.
speckit-implement
Another command that requires no input prompt. But, if you are experienced with AI Coding Agents, you know you need to manage the context window and your cost.
This is the moment to choose the right model (Sonnet? Opus?) for the tasks ahead, so you can pass the names of the specific tasks you want to implement in the next loop.
One important reminder: this entire flow is Git(hub) based, so for each feature cycle, the Spec Kit automatically creates a new branch (which is exactly what you want).
Don’t forget the SDD
During feature development, if you customized something or discussed a new requirement directly in chat, update the spec right away. At the very least, at the end of each feature cycle, take a moment to ask your AI Coding Agent to update the spec files with everything learned along the way — especially the non-technical decisions.
A human or an AI should be able to fully recreate the feature and understand all its requirements just by reading the spec.
Keep it updated.